PocoMail's proprietary viewer offers good security because it is not vulnerable to viruses that may be transmitted by using Microsoft's Internet Explorer, while still allowing you to enjoy HTML mail, if you choose to. The viewer handles HTML coding, enables launching of URLs received in e-mail messages, and opens a new message composition pane if you click on an appropriately formatted e-mail address in an e-mail message.
You can disable graphics several ways:
If you can't remember whether or not you have graphics enabled and forget where to look for it, you can also tell by the "placeholders" that are used for the graphics display.
![]() This is the placeholder you see when graphics is turned on.
This is the placeholder you see when graphics is turned on.
![]() This is the placeholder you see when graphics is turned off.
This is the placeholder you see when graphics is turned off.
If you receive styled mail with embedded graphics, PocoMail will display them as intended.
If you chose to leave attachments encoded inside the message, any attachments you receive will not be automatically separated from the e-mail message and routed to the PocoMail Attachments directory. The attachment(s) will be described in the attachment pane (which appears to the right of the e-mail message in both Preview and expanded Message Panes) or below the message, depending on your settings. In order to access these attachments, right click on the file name and you will be prompted as to where you wish to have the file extracted and saved. You will not be able to "launch" the attachment until you have saved it to another location. The supported attachment types will still be displayed inline, below the message.

Note that toggling threading in any mailbox turns it on (or off) for every mailbox. Threading is active when the icon is in reverse video.
What will you see when mail is threaded?
When new mail is downloaded and meets the criteria specified for threading, PocoMail will attach it to the appropriate parent or child message. A threaded message is indicated by the + (red plus sign). Clicking on the red plus sign will become a - (green minus sign), expand the thread, and the child message will appear below the parent message.
If you toggle threading off, the messages in the thread will disperse into whatever sorting scheme you have chosen (ascending date, descending date, etc.).
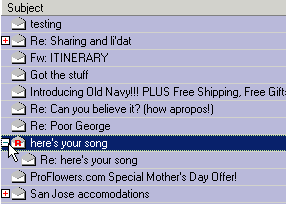
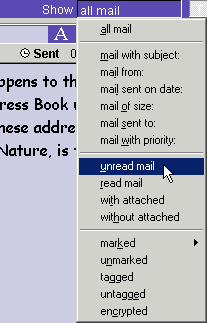 The Show Only Bar is on Index Toolbar at the upper right just before the Thread icon. Clicking on the "all mail" will access a drop down menu of choices. Click on unread mail. Only unread messages will be displayed in the index pane and all the rest will be hidden from the view.
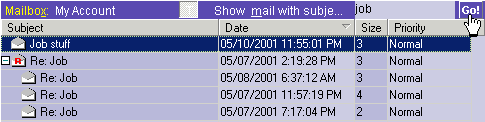
Using any of the "mail" options will expand the Show Only bar to show a blank field. You can then specify the subject of the messages you want displayed in the index pane. While most of the options are specific, the search on subject will be broad. That is, PocoMail will search and match characters to the "subject' field, and display any messages that contain that string, but not only that string, as in image below. Note that all messages with the subject containing the word "job" are displayed in the index pane. (Note also that threading is active as the "T" icon is in reverse video.)
PocoMail also allows you to search for and display messages without using the Show Only Bar.
Right click on a message with one of the characteristics you wish to isolate, such as the message Priority, Date, or whether it has an attachment or not. A drop down menu will appear that allows you to pick related Show Only options, such as Show Only This Sender, Show Only This Thread, Show Only by: Date, To, Priority, unread messages or messages with attachments.
If you can't find the message you want using the Show Only options, try using Search Messages function to scan your other mailboxes in case the message was moved to another mailbox.
Using the image above as an example, every column header in the Index - Subject, Date, Size and Priority - can be used as a toggle to sort in ascending or descending order. Clicking on the "Subject" column header in the index will sort messages alphabetically, clicking on "Date" will sort in date order, and so on.
Find in message - This is a very specific search function designed to assist you in finding a string of characters - a word or a phrase - in the body of the e-mail message currently displayed in the Preview Pane or Message Pane.
Search messages - This is a broader search function designed to search through all mailboxes or only the current mailbox for specific text or character strings.
Both are described below in detail.
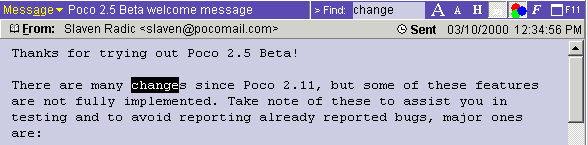
Type in the phrase you want to find and press the Enter key. The first instance of the phrase will be highlighted. Each time you press the Enter key, the next instance of the phrase will be highlighted.
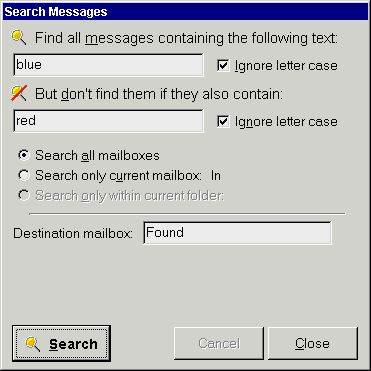
As you can see from the example in the above image, PocoMail will search in all mailboxes for any messages containing the word "blue", ignoring the ones that contain both the words "blue" and "red", irrespective of case. Once messages meeting the conditions are found, PocoMail will copy them into the specified Destination Mailbox.
The Found mailbox is the default destination box. Don't be alarmed if you haven't created a Found mailbox before using this function, as one will automatically be created in this process. You can specify an already existing mailbox, or have one auto-created by typing in a name for a new mailbox.
But in which mailbox was the message found? If you view the short headers of messages in the Found mailbox, you'll see that a new field has been appended, "Found In". This field will indicate in which mailbox the original message is located.
![]() What is the difference between tagging and marking?
What is the difference between tagging and marking?
Tagging is done manually on specific messages. Tagging is not customizable in as far as it cannot be assigned a specific "label" or colour independent of that specified for tagging in the active PocoMail colour scheme or "skin". Message tagging is not permanent, it will be lost when the mailbox is compressed and should be used for quick operations.
Marking, which can be manually applied to messages, can be customized as to colour independent of the current colour scheme, as well as labeled with a description. In Program Options - Reading Mail, you can set up to eight different colours and descriptions in the Message Marking screen. Further, marking can become a component of a filter action to automatically act upon incoming and outgoing mail messages, which will be discussed at more length in Filtering.
If you are browsing your mail and find a specific message that you want to highlight for attention later, or to remind you to do something, you may want to tag it. You can tag and untag a message in a couple of different ways:
You are able to perform search, select and other actions - such as move, copy or delete - on tagged messages using:
Upon installation, PocoMail includes some "default' colours and descriptions for marking to the keys, but these are more by way of example. You may change the default assigned colours as well as the descriptions of the Quick Key combinations (which are set in the Message Marking screen in Program Options - Message Marking).
The following table illustrates the "original" Mark descriptions, and related Quick Keys:
| Mark | Original Description | Quick Keys |
| None | Clear Mark * | Alt+0 |
| Mark 1 | Reply | Alt+1 |
| Mark 2 | Follow up | Alt+2 |
| Mark 3 | Trash later | Alt+3 |
| Mark 4 | File away | Alt+4 |
| Mark 5 | Customize this mark | Alt+5 |
| Mark 6 | Customize this mark | Alt+6 |
| Mark 7 | Customize this mark | Alt+7 |
| Mark 8 | Customize this mark | Alt+8 |
* To avoid confusion, note that Clear Mark is part of the drop down menu options, and is not a configurable option in the Message Marking set up screen.
Get to Marking by highlighting a message in the Index pane and right clicking to get to the drop down menu, then select Mark to access all the options in the above table, as well as Modify message markings.
Modify message markings will open up the Program Options screen that allows you to customize the colours and descriptions assigned to the Marks.
You can get to Edit Message from:
The Compose New Message window will open and you can edit the message as you would any other new or forwarded message. When you are done editing, use File, Save to save the edited e-mail as either a text file, an HTML file or an EML file. You will be able to open these files in any text editor or browser, or even in PocoMail's composition window. Instead of saving you can also re-send this message by using standard Send or Queue buttons.
If you are re-sending the message ("Send Again"), keep in mind that you can change any aspect of the message, including the To, CC or BCC recipients.
For instance, if you received a series of e-mails with the subject "Re: Dad's Birthday", but the messages had taken a hard left somewhere last week and was really about an upcoming vacation (Dad's birthday was two weeks ago, and no one changed the subject line), you might want to change the subject so you could search on "vacation" and isolate those particular messages.
You could also "force" threading of these wayward e-mail messages by editing the subject line. To carry on with the "Dad's Birthday" example, you would chose one of those messages to be a "parent" message (see Threading Messages) and change its subject (using Edit Subject Text) to "Vacation". Subsequent "child" messages would have their subject lines changed to "Re: Vacation". If the appropriate threading options are enabled in Program Options - Index Settings, and threading toggled on, then you will become the proud parent of a brand new thread!
To access the Edit dialog box:
You have two options with this edit function:
Often adding information to e-mail that has already been processed (received or sent) will cause the original information to change as well. However, PocoMail's annotation feature does not impact the integrity of header information. This is important if you wish to use header information in Filtering or Scripting, or something simpler, like customizing columns in the Index Pane.
How to access Annotation:
When you access Annotation, a small dialog box will pop up with a blank field. Type your note into the field. Don't be put off by what appears to be a small amount of space for notes, as the text will scroll as you type. You will not be able to insert an unlimited amount of text in the Annotation field, but it will hold a fair amount. When you are done typing, press OK.
Once you have annotated the message, a small yellow note will appear in front of the message icon in the Index Pane. This at-a-glance icon lets you know that a note has been appended to that message. Clicking on this icon will let you change the annotation quickly. If you hold your mouse over the annotated message in the index pane the note will be displayed in a tooltip.
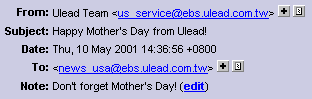
The annotation itself is now part of the e-mail message "header" information (see image above). and will appear in the message's abbreviated header as a Note. Clicking on edit will bring up the dialog box to allow you to add or revise annotation text. The edit function is only accessible from the abbreviated header view.
You can delete the annotation by clearing the text box, which will also make the Note field disappear from the abbreviated header.
In the Full Header view (PocoMail Menu - View, View Full Headers), expanded headers will show the "Note" field as "X-Poco-Annotation".
A note about mailbox compression: If you find that information in the index pane appears out of order or displays incorrectly, try compressing the mailbox (PocoMail Menu - Mailbox, Compress mailbox). This will rebuild the mailbox index and correct the problem.
![]()
![]()